Record Mac Sound or System Audio using QuickTime or Camtasia Screen Recording on Mac

Writing by on Wednesday, 28 of November , 2018 at 7:33 pm

For obvious reasons this has been disabled right-off-the-bat by Apple. Impact is that for recording the screen for future reference (legitimate presentations to be shared internally) such as a WebEx / web conference session the video will not have sound. While some Web conference vendors do support recording, it may not be applicable in most cases and hence here are few steps (while not necessarily super-intuitive for QuickTime, but easy for paid programs like Camtasia) to enable System Audio for such recordings.

From my tests, the sound quality on the exported .mov from QuickTime screen recording wasn’t as great as Camtasia .mp4 export, but it was reasonably good enough to get your job done. However, neither of them were equal to the native System Audio.

Simpler Route for Camtasia (if you’re having issues installing system audio)

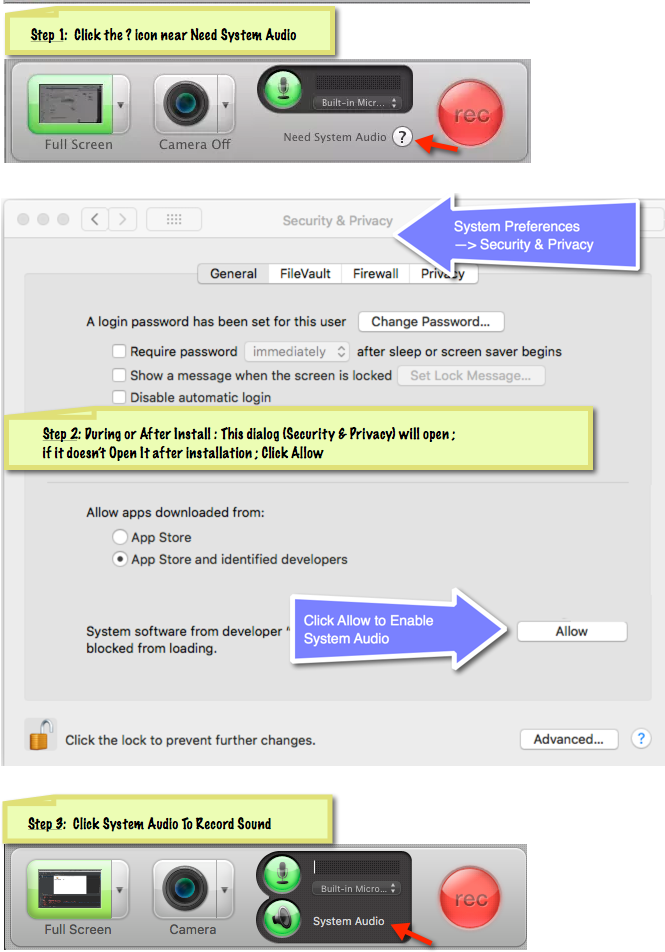
  • In the Camtasia Record Dialog, Click the ? icon near “Need System Audio”
  • During or After Install, the Security & Privacy dialog will open ; if it doesn’t Open It after installation (System Preferences –> Security & Privacy) ; Click Allow
  • In the Camtasia Record Dialog, Click “System Audio” to record sound from Mac

A slightly more involved route for Quick Time Screen Recording
The gist of it is that you will need to download and install IShowU to capture system audio, and then create an Aggregate Device (from Audio MIDI Setup) to include your BuiltIn Mic + IShowU and use this with QuickTimePlayer Screen Recording.

  • Install IShowU and follow steps on their website. (Remember to follow the steps in System Preferences –> Security & Privacy)
  • Open Audio MIDI Setup and create an Aggregated Device to include IShowU Audio Capture and BuiltIn Microphone
  • Open Audio MIDI Setup and create a Multi-Output Device to include Built-In Output and IShowU Audio Capture
  • Open up the QuickTimePlayer –> New Screen Recording and select the Aggregate Device that you created.
  • Record the screen w/ audio and save it.

A very good explanation on YouTube for you to follow from Michael Kinney is embedded below.

Leave a comment

Category: Mac,Tips and Tricks,Tools

Add An Auto Incrementing Number To Each Selection In Sublime Text

Writing by on Thursday, 2 of February , 2017 at 9:06 pm

The Increment Selection is a nifty package to add auto incrementing numbers to your selection in Sublime Text.

  • Select the Numbers that need the auto increment
  • Shortcut to auto-increment selection is Cmd + Ctrl + i

Click the visual below to see Sublime Text Magic

Leave a comment

Category: Tips and Tricks

Recover a corrupted gz

Writing by on Wednesday, 14 of October , 2015 at 7:13 am

Sometimes you might be able to salvage a corrupted gzip. Typically this trick always works on most log files.

$ gunzip corrupted.gz
gunzip: corrupted.gz: unexpected end of file
gunzip: corrupted.gz: uncompress failed

Use the -c option that outputs to console, but redirect to a new salvaged file. Then gzip the salvaged file to recover it.

$ gunzip -c corrupted.gz > salvaged
$ gzip salvaged

You can now delete the corrupted gz file and use the salvaged version.

Leave a comment

Category: Linux,Tips and Tricks

Download an entire AWS S3 bucket or file

Writing by on Tuesday, 24 of March , 2015 at 5:32 am

AWS CLI to the rescue. It’s really quick and easy. Install AWS CLI, add your keys to the credentials and then fire away.

Here are some of mine

alias s3ls=’function _s3ls(){ aws s3 ls s3://”$@” ; }; _s3ls’
alias s3get=’function _s3get(){ aws s3 cp s3://”$@” . ; }; _s3get’
alias s3getdir=’function _s3getdir(){ aws s3 cp s3://”$@” . –recursive ; }; _s3getdir’

Leave a comment

Category: Tips and Tricks

Show full path in Sublime Text

Writing by on Saturday, 28 of February , 2015 at 6:23 pm

If you want to see the full path to the currently open file on the title bar add “show_full_path”: true to the Settings JSON.

Sublime Text -> Preferences -> Settings – User
“show_full_path”: true

Leave a comment

Category: Tips and Tricks

Formula to convert Epoch Timestamps to Readable Date in Excel

Writing by on Thursday, 20 of November , 2014 at 1:47 am

If you have several epoch times that you want to convert to human readable date then here’s a great post from spreadsheetpage.com on converting Unix Timestamps.

In a nutshell … you use the provided formula and then format to date.

For GMT
=(((A1/60)/60)/24)+DATE(1970,1,1)

For Pacific
=(((A1/60)/60)/24)+DATE(1970,1,1)+(-8/24)

Right Click the Cell –> Format Cells –> Date

Leave a comment

Category: Tips and Tricks

Shivdev Kalambi's Blog

Shivdev Kalambi is a Software Development Manager, previously a Principal Software Engineer at ArcSight/HP. With over 16 years' experience in software development, he's worked on several technologies and played different roles and contributed to all phases of projects. Non-tech activies include Ping-pong, Rock Climbing and Yoga at PG, Golf, Skiing, Swimming & a beer enthusiast.