Writing by shivdev on Tuesday, 11 of November , 2014 at 9:20 pm
If you’re having trouble selecting entries one at a time (because there’s no Select All option available) then here’s a quick workaround to selectively clear your Google Chrome History.
- In the Chrome Address Bar type chrome://history
- To Filter and Delete Selective history, enter search criteria and hit Search History
- There’s no Select All Option but here’s a workaround …
- Select the first entry from where you want deletion to begin
- Scroll down to the end or desired entry and Shift Click that item
- Scroll up top and hit Remove Selected Items
That should be quicker than individually selecting the entries.
Category: Tips and Tricks
Writing by shivdev on Monday, 27 of October , 2014 at 4:18 am
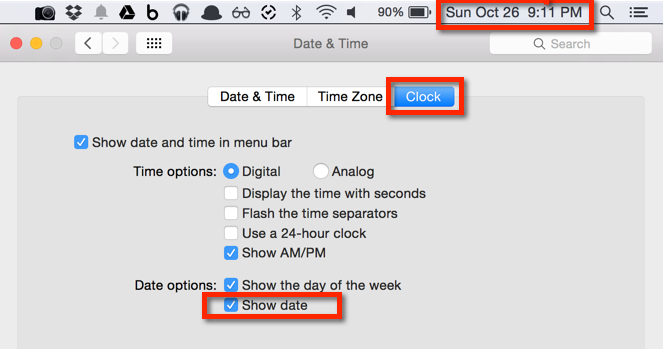
I’m not sure why this is not a default option, but if you want to show Date and Time in the Menu Bar on a Mac, then you you will need to set that in your System Preferences.
System Preferences –> Date & Time (Select Clock) –> Check Show date
Here’s a screenshot.
Category: Apple,Tips and Tricks
Writing by shivdev on Saturday, 13 of September , 2014 at 6:30 pm
Even after installing multiple version of the Synaptics Touchpad Drivers I wasn’t able to emulate the Middle Mouse Button by pressing Left/Right Buttons on my HP Laptop’s Touchpad and finally after some searching on the web I found a solution from sinairv. Note: You will have to mess with “regedit”.
# Open up regedit for changes to Windows Registry
Step 1: Start –> Run –> regedit
# Look for where you need to make the changes
Step 2: Edit –> Find –> 2FingerTapAction
# For me the path was
# HKEY_CURRENT_USER\Software\Synaptics\SynTP\TouchpadPS2_2
Step 3: Notice that there are several Mouse actions
# Create a new entry to add
Step 4: Right Click –> New –> DWORD
# New value HasBothButtonFeature = 1
Step 5: Enter HasBothButtonFeature with value 1
# Let changes take effect
Step 6: Log off and Log in
# Test emulation of middle click
Step 7: Open a browser and a new tab and press both buttons to close the tab
That should make your browsing experience a bit faster now.
Category: Tips and Tricks
Writing by shivdev on Thursday, 13 of March , 2014 at 5:54 am
The idea behind Google Authorship is to link a content author with his Google+ profile. In doing so, when Google displays Search results, your Google+ photo would appear beside the description.
I would recommend following the best set of instructions for this on BlindFiveYearOld to implement rel=author. Another article explaining this is from kissmetrics on how to get your picture in search results.
Here are some Help Topics from Google.
Category: Google,Tips and Tricks
Writing by shivdev on Sunday, 2 of March , 2014 at 4:31 pm
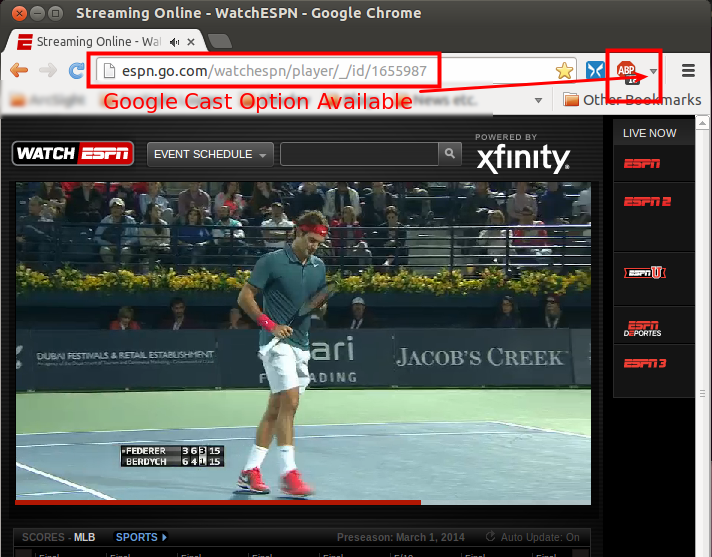
If your ESPN3 video opens up in a popup (or a condensed window as they call it) and you don’t see the “Google Cast” option, then this article from Encosia explains how.
Step 1:
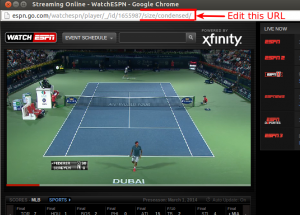
In the Popup (where there’s no Google Cast Option) Copy the URL,
http://espn.go.com/watchespn/player/_/id/1655987/size/condensed/
Step 2:
In a Google Chrome Tab (where you do have Google Cast) paste just a part of the URL
http://espn.go.com/watchespn/player/_/id/1655987/
In the Tab you should see the option to “Google Cast”. These two screenshots should explain it.
Step 1
Step 2

Alternatively, there’s an option in Google Chrome that’s not available on Ubuntu (at this time) so didn’t work for me.
Right Click Window Title in the Popup (where you’re not able to Google Cast)
Select “Show As Tab”
Category: Google,Tips and Tricks
Writing by shivdev on Tuesday, 11 of February , 2014 at 7:20 am
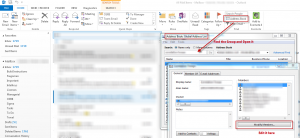
I’ve always had to try a lot of things and search a lot to get to adding/removing or modifying members in a group or alias or mailing list or distribution list or whatever the right term for it is, within Microsoft Outlook. But the easiest way to do so is from the Ribbon.
Home -> Address Book -> (Search or Select the Group) and Open -> Click Modify Members… -> Add/Remove Members
The screenshot below shows exactly where and how to get there.
Category: Tips and Tricks